0

Authenticating Linux users against Microsoft Active Directory

If you work in a company with Microsoft Windows focused IT this is a great way to delegate your Linux users authentication. No more “I forgot my password”. With this configuration you are free of that. However you still can create local users without this centralized authentication.

This was tested with Ubuntu 8.04, 10.04 and 12.04

Active Directory credentials

The first step is to ask the Active Directory guys permission to use their authentication service. They will give you:

  1. The network address of the Active Directory (one or more, usually by IP address)
  2. A base DN
  3. A bind DN user
  4. A bind DN password

This bind designated name will permit your systems to use the Active Directory. The base DN is the top level of the Active Directory (LDAP) directory tree.

The LDAP client configuration

You should install these modules. Usually it will ask for LDAP parameters during the installation. You can just ignore them at this time.

sudo apt-get install libpam-ldap
sudo apt-get install libpam-modules

Now just edit your /etc/ldap.conf with the information you got in the previous section

host 10.11.12.13
base ou=ACME,dc=example,dc=com
ldap version 3
binddn cn=Linux Auth System,ou=ACMEServiceAccounts,dc=example,dc=com
bindpw uwegyjus
pam_login_attribute sAMAccountName

Adapting the pam modules

Now make sure all the /etc/pam.d/common-* files are like these

/etc/pam.d/common-account

account    [success=2 new_authtok_reqd=done default=ignore] pam_unix.so
account    [success=1 default=ignore] pam_ldap.so
account    requisite pam_deny.so
account    required pam_permit.so

/etc/pam.d/common-auth

auth    [success=2 default=ignore]    pam_unix.so nullok_secure
auth    [success=1 default=ignore]    pam_ldap.so use_first_pass
auth    requisite                     pam_deny.so
auth    required                      pam_permit.so

/etc/pam.d/common-password

password    [success=2 default=ignore]    pam_unix.so obscure sha512
password    [success=1 user_unknown=ignore default=die]    pam_ldap.so use_authtok try_first_pass
password    requisite                     pam_deny.so
password    required                      pam_permit.so

/etc/pam.d/common-session

session    [default=1]    pam_permit.so
session    requisite      pam_deny.so
session    required       pam_permit.so
session    required       pam_unix.so
session    optional       pam_ldap.so
session    required       pam_mkhomedir.so umask=0022

But every authentication will fail. Your system doesn’t know anything about these new users. You have to add each user first :-)

Adding Linux users

You may have a framework to deploy users among several machines, but we will just add one:

sudo addgroup acme

By default all these foreign accounts will belong to the acme group.

sudo addusers --no-create-home --ingroup acme pkdick

and you just add to one of your systems user pkdick belonging to group acme. The /home/pkdick creation will be performed automatically by the pam system (pam_mkhomedir.so) and not by the addusers command.

So…

  • Get the authorization to deal with Active Directory
  • Install libpam-ldap + libpam-modules
  • Update /etc/ldap.conf and check /etc/pam-d/common-*
  • Create the Linux users with the same user name from the Windows Domain.
0

Digital Pathways – SecureNet Key


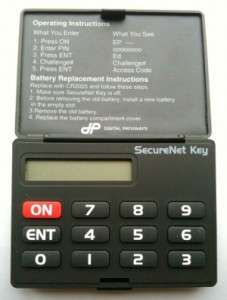
Last weekend while repacking some boxes I’ve found my beloved SecureNet Key. I used with telnetd servers before ssh become mainstream. I think it’s time to write down here the instructions for it.

What it is

The SecureNet Key (known as SNK) is a small, challenge/response hand-held device that resembles a pocket-size calculator, with a keypad and a LCD display. It performs DES encryption with a key in its memory. There’s a four digit PIN to restrict the device access.

How to use it

When a system you want to log in requires SNK authentication, it prompts with a number as a challenge. The user, through the keypad, types its PIN along with the challenge number into the card. A response is generated to the LCD display using the secret key embedded in the device with the challenge number. The user type the response into the remote system as his one-time password.

Mode Number

Mode Number
Display Format Capability Single Digit Challenge
Off
Single Digit Challenge
On
Hexadecimal
Off
1
3*
Hexadecimal
On
5
7*
Decimal
Off
0
2*
Decimal
On
4
6*

* Indicates Defender Systems only

Mode Number

Mode Number
Display Format Capability Single Digit Challenge
Off
Single Digit Challenge
On
Hexadecimal
Off
1
3*
Hexadecimal
On
5
7*
Decimal
Off
0
2*
Decimal
On
4
6*

* Indicates Defender Systems only

Operating Instructions

Turn on the SNK and enter your PIN at the EP prompt. Press the ENT button. Enter the challenge at the Ed prompt, again followed by ENT. Then type to your system the response generated by the card. If you make a mistake at any time, reset the device by pressing ON.

Operating Instructions
Step # What You Enter What You See
1 Press ON EP —-
2 Enter [PIN] oooooooo
3 Press ENT Ed
4 Enter Challenge# Challenge#
5 Press ENT Access Code

Clearing The Memory

Clearing The Memory
Step # Step description Comments
1
Press ON If the display reads EP, go to step 2. If the display reads E0, this is the sign that the memory has already been cleared – go directly to step 11.
2
Key-in: 3 The display will now read o.
3
Press Ent If the display read Ed. go to step 4. If the display reads Error, repeat steps 1, 2, and 3 until the display reads E0. When the display reads E0, the SNK memory has been cleared – go directly to Step 11.
4
Key-in: 0 0 0 0 0 0 0 0 (Eight Zero’s)
5
Press: Ent A Response Number will appear on the screen. Ignore it.
6
Press: On The display will now read EP.
7
Key-in: 3 The display will now read o.
8
Press: Ent The display will now read Ed.
9
Key-in: 0 0 0 0 0 0 0 0 0 (Eight Zero’s)
10
Press: Ent If the display reads E0, go to step 11. If the display message is anything else, repeat this procedure, beginning with step 1.
11
Put the SNK aside The SNK memory has been cleared.

Loading Mode and Key Numbers

After the mode number, at the E1 prompt, enter your secret key, which consists of eight three-digit octal numbers. While you are entering these digits, the LCD displays a number ranging from 1 to 8 on the left side of the display. This number corresponds to the octal number you are entering, and changes when you enter the first digit of the next number. When you are done entering your key, press ENT twice.

Loading Mode and Key Numbers
Step # Step Intructions Comments
1 Press: ON Ready to begin loading sequence.
2 Key-in: [mode number] Load Mode Number
3 Press: Ent Ready for first Key Number entry
4 Key in 1st value Ready for next value.
5 Key in 2nd value Ready for next value.
6 Key in 3rd value Ready for next value.
7 Key in 4th value Ready for next value.
8 Key in 5th value Ready for next value.
9 Key in 6th value Ready for next value.
10 Key in 7th value Ready for next value.
11 Key in 8th value Ready for next value.
12 Press: Ent This checksum must match that provided by the Defender. If it does not, return to step 1 of this procedure.
13 Press: Ent Ready to load PIN

Initial Loading of the PIN

At the E2 prompt, enter a PIN for the box. After you confirm by retyping the PIN at the E3 prompt, you can use the box as normal.

Initial Loading of the PIN
Step # Step Instructions Comments
1 Press: On The display will now show a readiness code of E2.
2 Key-in: [PIN] The actual PIN will not be displayed. Instead, each PIN digit entered will be echoed with a lower case letter ‘o‘.
3 Press: Ent The display will now show a readiness code of E3.
4 Key-in [PIN]again. The PIN is reentered to verify that the PIN was entered correctly. If this PIN entry does not match the last PIN entered (step 2) the SNK will automatically display a readiness code of E2; requiring you to start again, beginning with step 2.
5 Press: Ent The display will now show a readiness code of EP, indicating that the SNK is now ready for use.
0

Using more than one server in Authen::TacacsPlus

Added the possibility of using a list of TACACS+ servers to the perl module Authen::TacacsPlus.

Just pass an array reference with each server parameters to the constructor.

my $tac = new Authen::TacacsPlus(
        [Host=>tp1.example.com, Key=>'Th3k3y', Timeout=>5],
        [Host=>tp2.example.com, Key=>'kikiriki'],
        [Host=>tp3.example.com, Key=>'l0keet', Port=>4949]
);

The order is relevant, so it will only try tp2 if tp1 failed.

Please note that it’s a server fail (unreachable, wrong key) and not an authentication one. If tp1responds with a failed authentication it won’t test the other servers. You can get the patched version from the “moreservers” branch at https://github.com/biafra/Authen–TacacsPlus/tree/moreservers It will not break the use of the other syntax.

$tac = new Authen::TacacsPlus(Host=>$server,
                              Key=>$key,
                               [Port=>'tacacs'],
                               [Timeout=>15]);

Update: It has been included in the module distribution (v0.21) by the maintainer.